Thursday, December 26, 2019

Horace & Boo - Slurpy Ice Cream

Good day!!  Today I'm going to share how I made it look like my sentiment is made of chipboard!  😀   First to mention tho, I chose to pair up these cuties with the gorgeous "In Love With Autumn" 6" x 6" craft papers.

This image is from the Horace & Boo line called "Slurpy Ice Cream" and I used the Posydoodles Rectangles to cut my shape.  I've colored them with my Prismacolor pencil crayons and gave Horace a licorice ice cream cone.  Mmmmmmm I think that would be rather delicious right now!  I envisioned Boo's ice cream to be some kind of orange chocolate treat.  You know the chocolate mandarin oranges that come out at Christmas time?  You smack the orange on the counter and it breaks it into a bunch of individually wrapped orange segments that taste like orange chocolate.  Now that I'm describing it, it doesn't sound tasty but trust me it is.  😜

For my faux chipboard as I've named it, I cut 6 pieces of my Celebrate sentiment from Bazzill cardstock but any cardstock would work, especially anything thicker.  I then glued each piece using my glue stick as the tip is a lot thinner than my glue bottle tip.


After I finished gluing it, I embossed it using UTEE extra thick embossing powder and I did 2 layers of the powder.


Once it dried it was quite hard so you really might think it could be chipboard.  I also added the UTEE to the banner at the top but used shimmer embossing versamark so it has a bit of a sheen in real life.


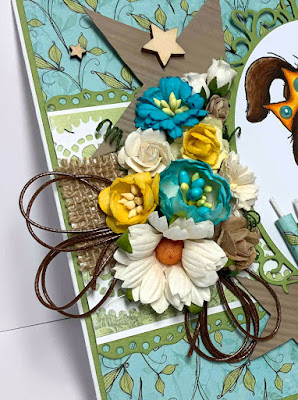
I added a few flowers here and some gold leaves I had in my stash.  These leaves shape rather easily so they didn't have to lie flat like they came in the mail.  I have to be honest, I'm far too lazy to die cut leaves.  Isn't that awful?  But I normally have so much going on with my card that I sometimes think it's enough before leaves even enter the picture.  🤣  Works for me!!!


Is there anything that you create and can call faux?  I love when that happens!!!

Thanks so much for stopping by!
Eulanda

Prismacolor:

Grass - Pale sage, Sap green, Kelly green, Olive green, Kelp green
Collar - Jade green, Muted turquoise, Slate grey
Dog - Beige, Peach Beige, Light Umber, Chocolate
Cat - Warm grey 10%- 90%
Popsicle stick - Cream, Beige, Ginger root
Cone - Deco yellow, Canary yellow, Yellow ochre, Goldenrod
Chocolate orange ice cream - Sunburst yellow, Yellowed orange, Pumpkin orange

Sunday, December 22, 2019

Shaker Card Video & GIVEAWAY Polar Bear

Today I have a video to share on my Polkadoodles Polar Bear Fun die cut shaker card so the great thing about this is you can hear and see it for yourself here:


I've used the following products from Polkadoodles:


The bear is made of flock with some silver bits in it.  Sooo super cute!

Thanks for coming by today!
Hugs,
Eulanda

Friday, December 20, 2019

Hello Bluebird Warm Wishes

My first Hello Bluebird card!!  What a bunch of cute images and cards I've seen circulating the crafty world so I thought it was time I had a go at them!!
This cute set is called "Cocoa Party" and I've used the die set as well to cut them out.  Those things are so handy!  I also used the "Warm Wishes" die and I created the color using my distress oxides and then splattered with white and black paint.  Love that technique!!

Annnnd as you can see it's a shaker card!


Thanks for stopping by!
Hugs,
Eulanda

Monday, December 16, 2019

Lawn Fawn Sweet Christmas

I LOVE THIS CARD!!   I had soooooo much fun creating it because while I was doing it, it took me back to my childhood!!!  At one point you really could believe this existed.  

My card is an 8" x 3" and I really enjoy these wider scenes so they'll be more to come of those.  😀


The cabin is just plain and I thought it needed more texture so I created and colored in the logs with my copics.  


Don't they look like a happy little gingerbread family?!!  LOL!!  


Products I used are:


Thanks so much for stopping by I hope you enjoyed my card.  Let me know if you have a memory like this.  I'm hoping I'm not the only one.  LOL!

Hugs, 
Eulanda 

Sunday, December 15, 2019

Heartfelt Wishes

Good day!!  I'm back to share my latest Polkadoodles Christmas card with you.  I'm using .... sigh.... yes another image from Winnie Winter Wishes.  Are you tired of them yet?  LOL!!  I just think they're so adorable but I've said that before.  hee hee

I've used 3 different paper pads:


I used Posydoodle Rectangles but if it doesn't quite look like a rectangle, you have a good eye and you're right, I did have to manipulate the die somewhat but I'm going to share that with you in a future tutorial.  This might save you some money!!  

I colored "Heartfelt Wishes" using my Zig markers - eeeee - I'm just learning so don't be too harsh on me.  LOL!!   And I added some Snowtex under their feet and used Ranger's Enamel Accents to add snow all over my image.   That about made me throw up when I first started.  ha ha ha I've never done it before so it was a bit of an eeeek moment!!  


HOW FUN IS THIS "HAPPY FESTIVE SNOWMAN"?!!!   So cute!!!  I added some Snow-Tex to him as well just to give him some texture and then added a little stack of snowballs beside him.  Who knows, maybe that's his little kids.  LROL!!!  Ahhh I couldn't resist!!  


Well there you have it for today!!  Thanks for taking a peek and enjoy your day!
Hugs,
Eulanda

Saturday, December 14, 2019

Load of Boo & Horace

Eeeeeee how cute are THEY?!!  This image is "Party Friends" and off they go with their presents to a friends birthday.  Well, I imagine it being a birthday but maybe it's an anniversary or retirement party.  In the envelope there's a handmade card and gift certificate for a dinner at the finest restaurant in their town!!  🤣😁 On the bottom right I added a stack of "Posydoodles Tags" using scraps from the "Bright & Beautiful" papers.  Again this just adds a nice feature of more texture by layering.  


I've had the "Glorious Border" (left side die) for a bit and I'm so happy that I finally got a chance to use it.  Isn't it stunning?  I can see this on many more cards to come!!  I don't know if you had an opportunity to see it or not but again I used the "Great Outdoors" stencil to help create the sky and I had created a video tutorial on that here.  


This image is now available in polymer at your favorite Polkadoodles stockists.

I hope you've enjoyed all my cards.  I had a ton of fun creating them!!  So, what do you think is in the gift box or envelope?  hee hee

Thanks for coming by today!
Hugs,
Eulanda

Wednesday, December 11, 2019

Scruff the Dog

Today's image is "Scruff the Dog Cupcake" and how delicious does that cupcake look?!!   This image is available at you Polkadoodles stockists in clear polymer or digi image onsite.

I've paired him up with gorgeous "Bright & Beautiful" craft papers and added lots of layers and dies.  The oval die under my image is "Elegant Nest" and it comes with 3 dies.

I even made my own candles.  So easy!!


I've added my usual bouquet of flowers and lots of stars.  For years I've been trying to sneak a tool off my sister and I FINALLY got it!! 😁😁  It's from Fiskars and it crimps your paper so that's how I managed to get the kraft stars looking like they are corrugated.  LOVE that look, just adds so much more texture than having them flat.  


Thanks so much for taking a look!  😍🤗
Hugs,
Eulanda

Tuesday, December 10, 2019

Friendly Cuddles

Today I'm sharing a cards currently in digi form in the store, HOWEVER, check out your Polkadoodles stockists as they have them in clear polymer and let me tell you they sure stamp off nicely!!  Love them!! 😁💕


I've colored up all my cards with my copics as I just really felt like I wanted my images to POP!!  This image is "Friendly Cuddles" and I decided to make this card round by using "Fanciful Circles" dies and "Posydoodles - Circles".

I've been dying to make a fall card for so long now and the "In Love With Autumn" papers were PUUUUURFECT for this!!  (I had to - 😜)


I added some fall butterflies (well...that's what I decided to name them - LOL) from my stash.  They're wood so I thought I'd try to color them and it worked!!  I used my distress inks and my copics but the copics were an epic fail so don't do that.  😣  Next time I'll try my distress oxides.  I just recently acquired them so I feel like I might have better luck with those.   I've also added my usual flowers and a pretty orange colored gem heart, that I  honestly never thought I'd use!  See?  If pays off to have stash!!  Hubby doesn't know what he's talking about.  🤣🤣  JK - actually he's very supportive of my crafting.  I'm lucky!


I hope you've enjoyed this card today!!  It's a break from the current christmas theme going around these days.  LOL!!  

Have a great day!
Eulanda

Sunday, December 8, 2019

Winnie Winter Celebrations

Good day!

I have some exciting news!  This weekend we Nikky is revealing some new images for celebrating birthdays in winter and it's the Winnie Winter Celebration collection!  Another fabulous batch that I'm just in LOVE with!!!

I'm sharing this image called "Invitation", which I've colored using my copics.  I used papers from "Gnome for Christmas" and "Peeling Paint".


I also decided to add a light to the balloon!!  Sooooo cute!!!  


I know it's crazy to think we need birthday card when we're so focused on Christmas cards and I feel for anyone who has birthdays in December.  Somehow it's not fair.  🤣🤣

Have a great weekend and I hope you get some crafty time in!!  I think it's needed now more than any time with all the stress that's involved with Christmas.  Although this year I've been lucky and somehow managed to avoid any stress.  Possibly because I almost finished all my shopping in November and I had my cards finished last year!!   That never happens and may never again.  LOL!!  

Warm winter hugs!
Eulanda

_________________________________________________

Copics:

C0, 1, 3, 5, 7
W1, 3, 5, 7
B21, 23, 26, 39
R24, 29, 59
Y00, 11, 15, 38
BG11, 13, 18
E34, 35, 37, 39, 29
E000, 00, 04, 11, 21, R20

Saturday, December 7, 2019

Yeti Village

I know I keep saying it but THIS WAS FUN!!  My first "Double Slider Surprise"!!  The 2nd picture explains it all.  I got a chance to play with the super cute "Yeti or Not" stamps and dies as well I added houses from the "Winter Village" set of stamps and dies.  At first I thought the dies were just a waste of money BUT NOW I GET IT!   😂😂😂  Makes it so much easier and quicker to get these little guys onto a card.  And honestly, I first thought these would be simpler and quicker than my other fancy cards.  NOPE!  They're not!!  😂😂😂  I suppose if I just stuck to a couple images on a card it might be buuuuuuuut ummmm I like having lots.  Are you really surprised?  😏😏


TA-DA!!  Surprise!!  Now there's a whole Yeti village scene!!  I've used LF's Snowday Remix papers and the Stitched Hillside borders to help create my outdoors theme.


Isn't this just stinkin' adorable?!!  Have you made a slider yet?  Did you find it easy?  I really liked Lawn Fawn's video tutorials.  They helped out so much!

Here is a quick look at how this slider works on my You Tube channel:


Thanks for coming by today!   I hope you liked my slider surprise!

Hugs,
Eulanda

Thursday, December 5, 2019

A Simple Happy Birthday

Today I'm going to share how I created a simple masculine birthday card.  Amidst all the Thanksgiving and Christmas cards being made, we still need to create birthday cards as well.  I have 6 within 5 weeks and 3 of us are all on the same day!


I love that this Happy Birthday die is so big that you can use it for the focal piece of your card.  I die cut 5 pieces of black Bazzill paper, glued them together and then covered it in Tim Holtz distress glitter.  I call it my man glitter because it's just a smidge less sparkly than girl glitter.  LOL!!


For this card I've used papers from the French Twist 6" x 6" paper pad.  I die cut a bigger tag using the Posydoodles Basics Tag dies and also a 2nd piece using black cardstock to layer them.  Then I tied up 2 bows using wax cord and seam binding to complete that piece.

Do you have trouble with masculine cards?  If so, I hope I've inspired you to create something similar.  I always say if you have a stencil, ink, some dies, buttons and twine you can create something quite easily.  Yet easy isn't so easy sometimes.  LOL!

Thank you for stopping by!
Eulanda  


Sunday, December 1, 2019

Mice on Ice

I thought I would share just a quick and easy shaker card I created awhile ago.  I put off blogging it because I've taken a ton of photo's and found it very difficult to take a picture of acetate on the shaker part because of light reflection.  Anyway,  I think I finally have it figured out.  Not for my video tho.  LOL!!  (palm to forehead) 

IT WILL NOT STUMP ME FOR LONG!!  😂😂


I've used Lawn Fawn's "Mice on Ice" and Whimsy's "Peekaboo Window Die 3" and "Celebrate Word and Shadow Die" set.

Here's the shaker action on my You Tube Channel:


Thanks for taking a peek!!  Have a great week!!
Hugs,
Eulanda


65% DISCOUNT ON PD DIES

SALE SALE SALE

http://shrsl.com/1zn13